
Wednesday, January 22, 2014
Thursday, January 16, 2014
I've got the BLUES
... but it's not a bad thing. My blues are coming from bottles of paint and sheets of paper.

Look closely and you will see eyes looking back at you. The eyes are a stamp, which when pressed onto the paint on the gelli plate creates a squiggle effect giving the print a dimensional look to it.

One paint color, print pulled on white paper. I used a scalloped cookie cutter to create the design in the print.

Blue and black paint, white paper, foam stamp, shelf liner

Just a bunch of random pulls of leftover paints. The copper is a metallic paint that doesn't photograph as shiny as it is in person

Another cleanup job

Printed on black cardstock. First level of print was a pale green leaf stencil followed but the pale blue paint and a paper doily mask.

Printed on dark blue cardstock, white paint, used a comb and a glass to make the design. Love the dimension that was created.

The first pull was green on white paper with a design. Wasn't too happy with it so I inked up the plate with a mixed blue and white paint, followed up with red paint that was applied to the gelli plate but not brayered out.
Thursday, January 2, 2014
The holidays are over and it's time to get back to business ...

Choosing my "word" for 2014 has been difficult. At times I find myself over-thinking everything which can really be frustrating. So, after several weeks of tossing words around in my head, today I finally made a choice. I'm going to have two words!
My words for 2014 are COLOR and CHANGE. The first word COLOR picked itself for me. I love everything about "color" and look forward to spending a lot of time filling my head (and everything that comes out of it) with colors. On the other hand, picking the second word was soooo hard. One word kept coming to me but I kept rejecting it. The word - CHANGE - is like a thorn in my side. I have such a hard time accepting change and in many cases will go out of my way to avoid it. I didn't want to consider CHANGE but my heart and head kept bringing it back up. Finally I decided to just give in and go with it. We can only hope that by the end of the year I will be able to successfully say that I now have a love relationship with the word CHANGE and everything that comes along with it.
So, now that you know how I'm starting out the new year, without further ado, let's talk about COLOR.
I just love printing with metallic paints.


There was no photo editing here, just tilted the print and viola!

Friday, December 13, 2013
Christmas Season
With all those gelli prints sitting around, it was time to create a little Christmas cheer. 
The print I used made some awesome trees, no need to add ornaments. A couple of wraps with metallic threads and some doodles with a gold metallic Gelly Roll pin and the card was complete. It found it's place among the Nativity set that comes out every Christmas.  This Nativity set was made for me by my mother back in the early '80s. It has a couple of dings and poor Mary lost her head a few years back (compliments of a nosy kitty). Thank goodness for super glue!
This Nativity set was made for me by my mother back in the early '80s. It has a couple of dings and poor Mary lost her head a few years back (compliments of a nosy kitty). Thank goodness for super glue! I love the traditions of Christmas, the decorations that come out year after year, and each year adding something new.
Wednesday, December 11, 2013
Homemade Christmas Cheer
A little bit of impromptu Christmas crafting. Using an old cheese server, figurines from my Christmas village, and a sprinkling of fake snow and I've created Christmas Under the Dome - I'm channeling one of my TV shows!

I've also combined my junker skills with my crafting skills and created my own version of a Charlie Brown Christmas tree.
I started with a piece of edging that I pulled up from the front flower bed
After a little help from my husband to remove the staples and wires that held the edging together, I sanded the blocks a little and then pulled out the craft paints to begin my magic.

While waiting for the creations to dry I went outside and cut down a pine tree that had sprung up in the front yard. Environmentalist don't be alarmed - it was destined to be cut eventually as it was growing right under the electrical wires and everyone knows that trees, Georgia weather, and outside electrical wires aren't a good combination.
I placed the tree in a stand in the middle of our front window.

Back inside I checked on my craft - I painted little houses, decorated for the holidays - the paint was dry and the houses were ready to be hung.

And here you have it, my very own Charlie Brown Christmas tree decorated with a Christmas Village.

I think it needs a string or two of lights but it's been too rainy to get out there and put any on. I'd actually need to buy some first because all though I have several unused strands of lights in my stash, I'm not sure any of them are safe for outside.
Time will tell if I ever get around to lighting the tree and meantime I wanted to go ahead and share my little decorating project. The cost of this project - $0.00 - I had everything on hand. Now that's what I call a priceless craft!
Close up of the houses


I've also combined my junker skills with my crafting skills and created my own version of a Charlie Brown Christmas tree.
I started with a piece of edging that I pulled up from the front flower bed
 |
| do not adjust your monitor - unfortunately this photo is blurry but I didn't notice it until after the craft was completed |
After a little help from my husband to remove the staples and wires that held the edging together, I sanded the blocks a little and then pulled out the craft paints to begin my magic.
While waiting for the creations to dry I went outside and cut down a pine tree that had sprung up in the front yard. Environmentalist don't be alarmed - it was destined to be cut eventually as it was growing right under the electrical wires and everyone knows that trees, Georgia weather, and outside electrical wires aren't a good combination.
I placed the tree in a stand in the middle of our front window.
Back inside I checked on my craft - I painted little houses, decorated for the holidays - the paint was dry and the houses were ready to be hung.
And here you have it, my very own Charlie Brown Christmas tree decorated with a Christmas Village.
I think it needs a string or two of lights but it's been too rainy to get out there and put any on. I'd actually need to buy some first because all though I have several unused strands of lights in my stash, I'm not sure any of them are safe for outside.
Time will tell if I ever get around to lighting the tree and meantime I wanted to go ahead and share my little decorating project. The cost of this project - $0.00 - I had everything on hand. Now that's what I call a priceless craft!
Close up of the houses
Maybe next year I will add to the collection but for now I'm enjoying a little bit of Christmas cheer - and Lyra loves watching the houses blow in the wind, sometimes even spinning like tops when there's a huge gust. Silly cat.
Monday, November 18, 2013
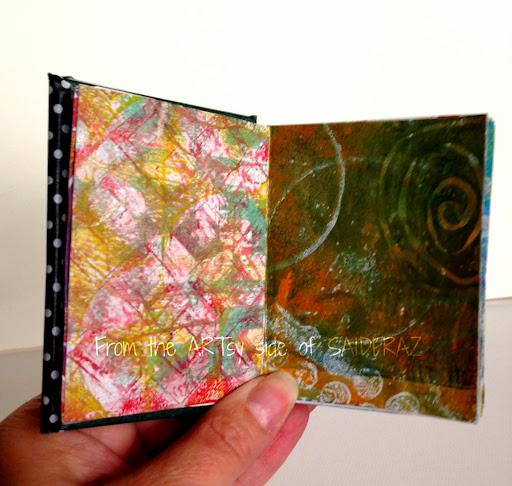
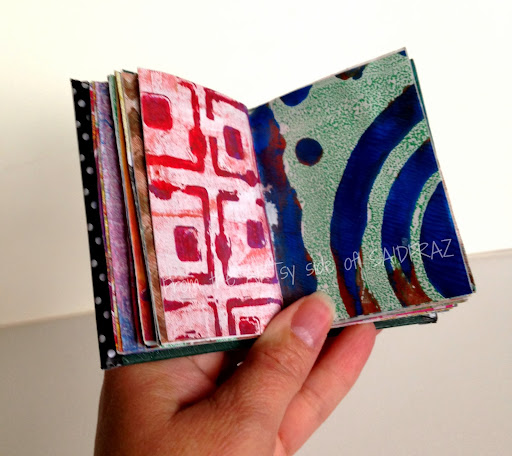
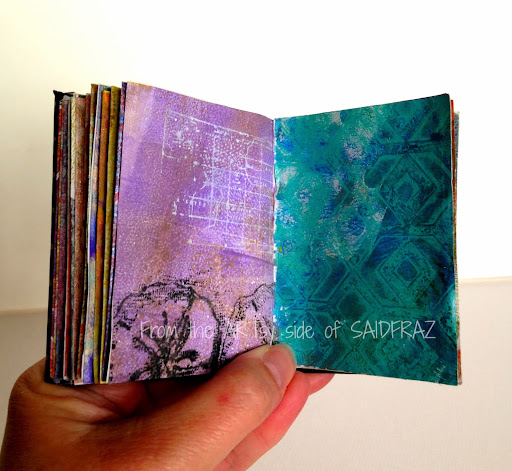
A Mini Book of Gellis
All those gelli prints that are stacking up .... some of them have found their way into a mini book.
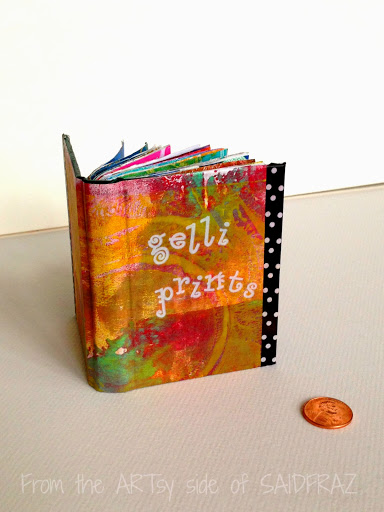
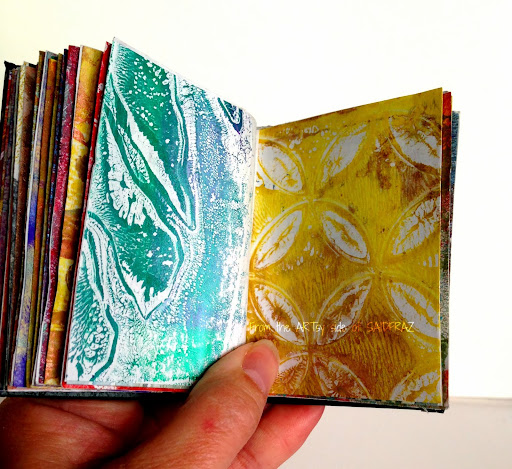

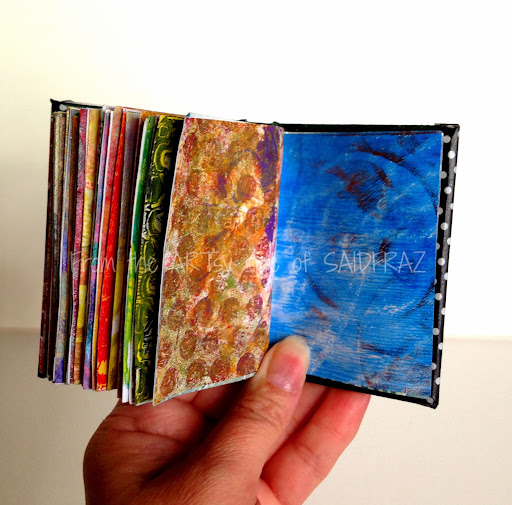
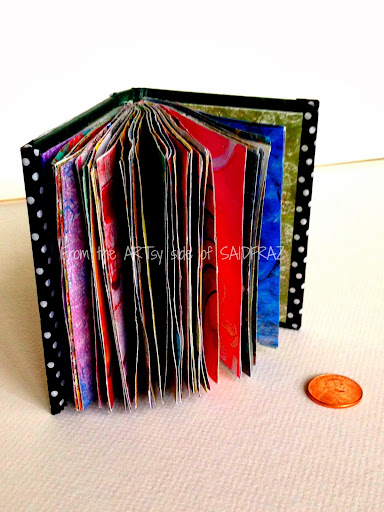

I used a small book that I found on the bookshelf
I cut pages from my favorite prints
and glued them directly to the pages of the book
the pages are 2 1/2 by 3 1/4
I removed some pages so it wouldn't be overly thick
62 pages plus front and back inside covers and
of course the book cover
it still doesn't close correctly but
I plan on putting it on the shelf standing up and fanned out anyway
'eh, everybody's a critic!
Monday, November 11, 2013

Subscribe to:
Posts (Atom)