Saturday, September 28, 2013

All Girls Like a Little Bling

About a month ago I got a wild hair to bring a little bling to ... of all places ... my CLOSET!

I was looking in my closet one day, trying to decide what to wear, and suddenly had an epiphany. Maybe just maybe if there was something bright and cheerful to look at while perusing my clothing choices, I just might forget how boring my wardrobe is.  Hmmm, what should I do?

Perhaps the answer could be found on Pinterest. Surely out of 73 boards and over 10,000 pins I can come up with something to inspire me. A lot of my pinning activity involves quilts. While I don't actually quilt myself, I love looking at what everyone else has created. From simple blocks to elaborate landscapes, quilting is truly an art form. My thought - why not glean some inspiration from the quilts on my boards and recreate it with paint?

So there you have it, I was going reface my closet door as a quilt. 

I started out by measuring and drawing out my blocks. Twenty-one big blocks, each with a border. Each big block was then divided into nine smaller blocks. It sounds easy enough but it took several hours to do. Side note: Almost immediately after I started painting I eliminated three blocks because I knew I wanted to hang a full length mirror in the middle and it made no sense to paint a design that wasn't going to be visible. And then, once all the painting was complete and I hung the mirror, I realized I could have eliminated four blocks. Oh well, live and learn.

Next I decided on a color scheme. I didn't want it to match the room where the walls are painted a neutral medium tone brown. Instead, I wanted bright, fun colors. I chose purple for the border, and pink, orange, and yellow for the blocksI decide on white as an accent color, and after I started painting the details of the individual squares I also brought in a little green and black. Obviously I wanted the blocks to look like fabric so my next step was to sketch symbols, patterns, doodles, etc. that would be the design of the "fabric" squares. 

The purple border came first followed by the individual squares. Next, over the course of several weeks, working an hour here and an hour there, I began to fill in the details. Ironically after I actually started painting the details, very few of the above sketches actually made it onto the "quilt." and while some of the designs are similar, no two squares are the same.  Slowly my "quilt" began to emerge.

As you know, quilts are stitched so naturally I had to paint the stitching in too. This step took F.O.R.E.V.E.R.  A tiny brush and hours of little dashes took it's toll on my hand. The first day I "stitched" for several hours and ended up with a horrible cramp in my hand. I broke up the remaining "stitching" over several days so as to not end up with a claw for a hand. I realize if I was really quilting instead of painting it would have taken a lot longer so I guess I got off easy, huh? And just in case you were wondering, painting the bottom three blocks was really hard. Finding a good angle for painting was. not. easy. I felt like a contortionist and at one point was actually laying on my stomach on the floor. Not easy for an old woman!

I finally finished my painting this week and last night hung the mirror. Here are the finished results.

I didn't really want my image in the mirror but it was the only way to take the photo!
A collage of all the blocks. 

My sister thinks the colors are too bright, said she couldn't face having to look at it every morning. Maybe if she had this master piece to look at every morning it might actually brighten her day! The main point here is that I created something for ME and I LOVE IT. It might not be anyone else's cup of tea but that's ok, they don't have to live with it. I told my husband if we ever put our house up for sale we'll have to attach a post-it note to the door that reads, "Buyer beware! This door is NOT included in the sale." I'm taking it with me!

-----------------------------------------------------------------------------------------------------------------------

Warning: closeup of each block to follow. Go put your sunglasses on! Also a disclaimer - I am NOT a professional photographer (not even close) and I couldn't get the angle right. I promise each block is truly square. 


This is the block that ended up being covered by the mirror. 
Once I knew it wasn't going to show I tried a little something to see if I could "age" the fabric or show depth. Obviously from the brown smudges, it wasn't coming out like I'd hoped so I stopped. Good thing no one sees it, huh?

Friday, September 27, 2013

Paper Embroidery - Part 3


Eddie asked me if sewing on paper is hard. The answer is neither yes nor no. You just have to be more careful sewing on paper!

Saturday, August 24, 2013

Weaving and clay


This isn't actually a new piece, it's just after two years I've finally gotten around to framing it. Soumak weaving with polymer clay heart adornments, mounted on felt. 


Monday, August 12, 2013

Did a little paper crafting today


Broken into pieces


like a puzzle,


each piece can stand alone. 


But all the pieces


together


Create a happy home


Thursday, August 8, 2013

A little organizational project

We have a basket that sits on top of the vanity in the bathroom that my husband and I share. Problem is there's just not enough room in the basket for all my stuff and his too, so I decided to do something about it. Mmmm boy, project time!
I'm trying really hard to not run out and purchase anything that I might be able to make at home so I searched the house for the materials needed. (Please don't let me regret all that stuff I threw out when cleaning out my craftroom) I came up with a cardboard box, fabric and paint from my stash, and a little glue. 

The result was this little box. 

It was almost perfect. 

What's missing? 

I know, legs!

Out in the garage I found a stash of wooden blocks.  
I can't for the life of me remember what they were leftover from but it's really immaterial. They are the perfect height for my box which I plan to sit on the floor next to the vanity. If you're wondering why the box will sit on the floor as opposed to sitting on the vanity, A) there's not enough counter space and B) while putting on makeup and drying my hair I close the lid to the toilet (which is right next to the vanity) and sit on it while getting ready. I know. TMI


Ta-da!  

Would you find it in a store or featured in a magazine? No. 
Is it useful and meets my needs? Absolutely. 
And the best part ... it cost me absolutely no money and only about 30 minutes out of my day. 

Mission accomplished. 

Monday, July 29, 2013

The Button Tree


Now that I've gotten rid of the ugly orange laminate counter top in the bathroom I may have to find a new home for my button tree. 

But, it's definitely staying somewhere, because I like it so much! 

Monday, July 15, 2013

A Little Light from Pinterest

While perusing Pinterest recently I came across a blog with an idea for lighting up the back patio. It looked pretty simple and inexpensive so I decided to go for it. 

I'd like to say I had the supplies on hand but alas 'tis not true, so I scurried on over to Walmart to pick up

  • mason jars  - $10 for a dozen - I only needed four but I can always find something to do with the rest
  • outdoor solar light sticks - $1 a stick x's 4 
As is par for the course for me, I wanted to put my own stamp on the craft so I also ran to Hobby Lobby to pick up some glass stones. - $9 for three bags, one each of clear, blue, and gold stones 

Back at home I started to assemble my Mason Jar Solar Powered Luminaries. I have to say that while the luminaries were fairly easy to put together, it wasn't quite as simple as she made it out to be. According to the blogger you are supposed to: 
Stick one end of the paper clip into the light (you might have to loosen the screws a little bit.) Use all three and space them evenly around the edge.
I never could  get this part right and ended up only using two clips and inserting them into the holes where the original cover attached.  
I also had to use black electrical tape to hold the clips in place. Next came the truly hard part ... screwing the ring on the jar to hold the light in place. Maybe she used smaller or less thick paper clips? I never could get the rings straight or tight but the clips are staying in place and that's what matters. 

Finally I got three luminaries put together and then discovered that the fourth solar light stick was defective. Note to self: before purchasing in the future, always check to make sure the tab that activates the light hasn't already been removed. Oh well, they say you're supposed to group things in threes anyway. 

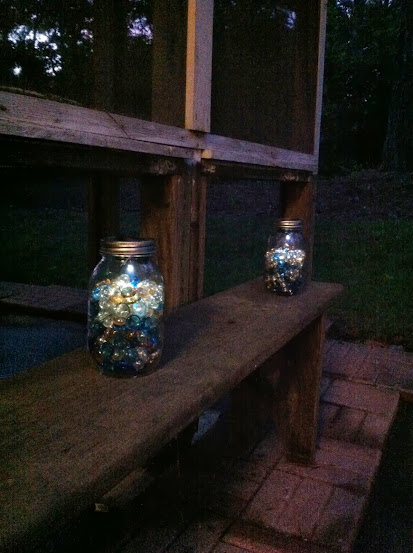
I thought the jars looked pretty good in the daylight but nighttime would be the true test. I went out at dusk and this is what I saw.
     
Not exactly the glow that I had envisioned. 


I checked back a little later and found it looked a little brighter but not much. As it got darker outside it was impossible to photo with my phone and my camera battery is dead so I can't show the difference, but trust me, they were pretty but not WOW! pretty.

I thought it might help to take some of the glass stones out, perhaps they are diffusing too much light? I also decided that I really wanted four lights as I had originally planned. So, the Hubs and I made a Walmart trek this weekend and I picked up another solar light stick (plus batteries for my camera, and a couple of T-shirts and a pair of shorts for my husband. Why is it I can rarely go into a store and come out with only what I intended to buy? Sigh.) Later in the day I made my fourth luminary. I took stones from the other three jars making all four about half full. I set them in place on the patio, three on the bench and one on the table. I then sat back and anxiously awaited for darkness to fall, hoping this time would be the charm and things were going to turn out "light".

You can only imagine my disappointment when I discovered last night that only two of the luminaries were shinning, one was extremely dim and the fourth was totally dark. Boo hiss!

It might have something to do with all the rain we've had lately. There hasn't been much sunlight to recharge the lights. Or perhaps something is loose?  I brought all the jars inside this morning to check them out and wouldn't you know that all four are now working?! Ever diligent, I reassembled the luminaries (with even fewer stones) and moved the jars back outside. Here they are sitting on a table in the middle of the patio,hopefully soaking up the sun's rays which are finally out. (I can't decide who's happier to see the sunshine, me or the birds chirping their little hearts out. I'd chirp too if I knew how!)

Tonight will be the true test. If they don't work after all this, I give up. It seemed like a good idea at the time but maybe it's just not meant to be. Meanwhile, I need to figure out what to do with all these left over glass stones   
Pinterest here I come!
----------------------------------------------
Woohoo, third time's the charm. My lights look bootiful! 

Not only do fewer stones allow for better light, they cast the most amazing shadows on the surface the jars are sitting on. 

A close up of the table light  Without a good camera it's hard to get a photo of the overall effect but I think you might see what I'm talking about. Anyway, I'd consider this "Pinterest Steal" a success even though it took awhile to get the right result. 

Moral of the story - don't give up, sometimes it takes a few tries to get the what you want!